Using the Customer Wishlists App
Table of Contents
Overview
The Customer Wishlists app allows your customers (and guests) to create and add products to an unlimited number of wishlists. From birthdays to weddings and everything in between, customer wishlists are a great addition to any store.
Wishlists can also have privacy options and optionally be shared publicly with a unique link.
Studies have shown that allowing your customers to save and manage their own wishlist can increase your sales and conversions. What better way to encourage customers to return to your site than allowing them to save items for later, or create their own dream list of products for that special occasion? In addition, allowing your customers to share their lists with friends and family via social media truly opens the doors to potential new customers and visitors.

Features
Admin views for Shop Managers
Admins & Shop Managers can monitor wishlists that users have created to get an idea of what customers are really wanting. From the admin panel you can view and sort your customer wishlists from a variety of options, and even edit Wishlists. This is also perfect for creating sales or sending out coupons for certain products to tempt your customers into completing a purchase!
Customisable
You can easily edit and adjust the app's settings in your website admin panel. Messages, buttons, and colours can all be customised, and you can even allow wishlist sharing through Twitter, Facebook, Pinterest, and Email.
More Features
- Allow Guest customers to create their own wishlists which will be stored for a maximum of 30 days or until they clear their cookies.
- Allow Registered users to create wishlists and store them indefinitely.
- Customers can create an unlimited number of wishlists.
- Customers have full privacy control over their lists. Wishlists can be assigned as public (anybody can search and find their list), shared (only somebody with the unique URL can view their list), or private (only they can view it).
- Guests and users can share their public or shared lists on social media.
- Full support for Simple Products, Grouped Products, Product Variations, and products using the "Product Addons" app.
- When browsing products on your website, customers will be notified if the item already exists in one of their wishlists.
- From a product details page, customers are able to add a product to an existing wishlist, or create a new one for the product.
- The "Add to Wishlist" text is customisable, and can even be changed from a button to a plain text link with an icon.
Setup & Usage
Once you've activated the Customer Wishlists app in your website admin panel, a few pages are automatically created for you on your website to handle the front-end functioning of the wishlists (View, Edit, Create, Find). These pages are already pre-configured and no further setup is required here - other than maybe adding the pages to a navigation menu.
The Customer Wishlists app is designed to allow users of your site to add items to a wishlist. Users will have the ability to create multiple wishlists, control the sharing visibility of those lists, and choose to share the list via Facebook, Twitter, Pinterest, and Email.
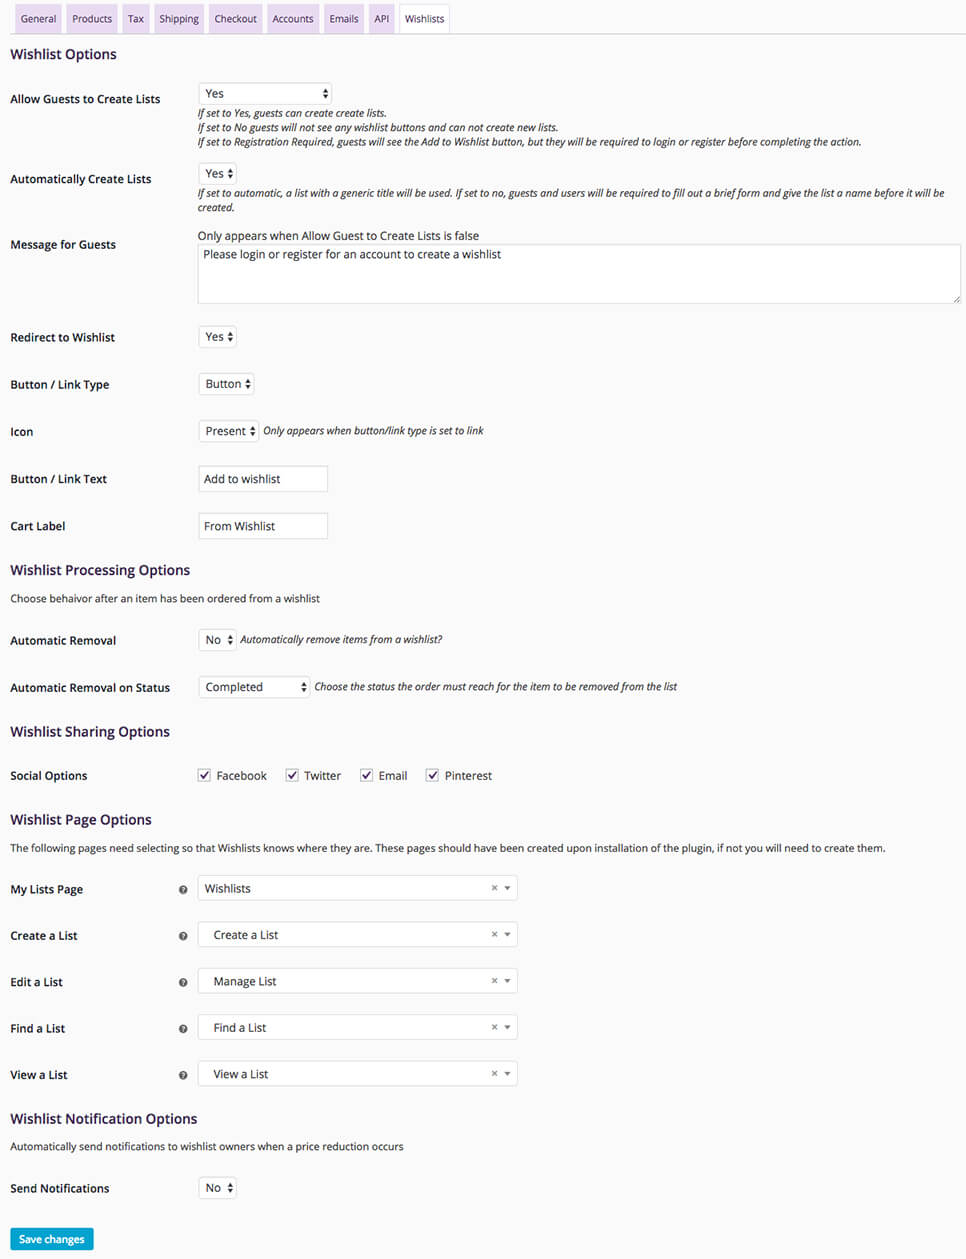
You can find settings for the Customer Wishlists app in your admin panel under "Settings > Store Settings > Wishlists".

- Allow Guests to Create Lists - Controls the ability for unregistered visitors to your site to create wishlists. If set to "Yes", guests can create wishlists. If set to "No", guests will not see any wishlist buttons and can't create new lists. If set to "Registration Required", guests will see the wishlist buttons, but they will be required to login or register before completing the action.
- Automatically Create Lists - If enabled, a list with a generic title will be used. If disabled, guests and users will be required to fill out a brief form and give the wishlist a name before it will be created.
- Message for Guests - When a logged-out user attempts to access the Create a List page they will be presented with this message. This only applies when "Allow Guests to Create Lists" is set to "No".
- Redirect to Wishlist - After a user adds an item to their wishlist they can be automatically redirected to the list. Set this to "No" if you want the user to remain on the product they were viewing and not be redirected.
- Button / Link Type - The "Add to Wishlist" link displayed on product pages can be displayed as either a button or a plain text link with an icon.
- Icon - Choose the icon you want displayed beside the "Add to Wishlist" text link on product pages.
- Button / Link Text - The "Add to Wishlist" button or link's text on product pages can be customised.
Wishlist Processing Options
With these options you can set up products to be removed from a wishlist if purchased, and you can determine what the order status should be before they should be removed from a wishlist.
Wishlist Sharing Options
The Customer Wishlists app has sharing built in for Facebook, Twitter, Pinterest, and Email. Choose which options you'd like to make available for your users.
Wishlist Page Options
In most cases these settings can be left as their defaults. The Customer Wishlists app creates several pages on your website when it's first enabled so that it can function. These pages need to be defined here so that the Customer Wishlists app knows which content to insert on each page.
Wishlist Notification Options
You can choose to automatically send notification to wishlist owners when an item on their wishlist is put on sale.
Managing Wishlists
Site Admins and Shop Managers can easily see the wishlists created on your website by heading to the admin panel and going to "Users > Wishlists".
Customer Usage
Adding items to a wishlist
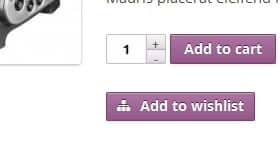
To add an item to a Wishlist click on the provided "Add to Wishlist" button or link. If you don't already have a wishlist one will automatically be created for you and the item will be added to it. If you do already have a wishlist you'll be shown a popup which allows you to select which list you'd like to add the item to. If you want to add the item to a new Wishlist, you can choose to create a new wishlist and add the item all in one step.
If you're not logged in your list will be created as a temporary wishlist. Temporary lists are based on cookies and will be available only on the same computer and web browser you used when the list was created. If you clear your cookies, or the cookie has expired, your list will no longer be accessible. If you do add items to a temporary list you can always log in and the list will be automatically saved to your account. Once a list has been saved to your account it will remain until you delete it.
View and manage wishlists
You can view and manage your wishlists from 2 different sections of the website. You can either navigate to the "Wishlists" page and access all your lists, or if you're logged in to your account on the site you will see the wishlists available from your "My Account" page.
To edit a wishlist you have already created click on the title of the list. This will bring you to the "Manage List" page. From here you can view and manage the items in your wishlist, and change the privacy and basic wishlist information
On the List Items tab you will see a list of the items you have previously added to your wishlist, as well as a set of actions you can perform on those items. To apply an action to items in your list, check the items, select the action from the dropdown menu, and click "Apply action". Your selected action will be applied to each item that you selected. Mark the top checkbox to select all items at once.
The actions available are:
- Add to cart - Adds all the selected items to the cart/basket.
- Update quantities - This will update the quantities for the selected items. Be sure to change the quantity on the individual line items by adjusting the Quantity field.
- Remove from list - This will remove the selected items from your wishlist.
- Create a new list - This action will take you to the create a list screen. After you create a new list, the items you previously selected will be added to the new list and removed from the original list.
On the Settings tab you will have options for editing the list itself. You can choose the privacy of your list and update the title, name, and email associated with the wishlist.
- Title - Sets the title of your wishlist.
- Description - Optionally add a description. Others will be able to see this when viewing your public or shared wishlist.
- Privacy Settings
- Public - Anybody can search for an see your wishlist. Users will also be able to search for your list using the name and email you provide.
- Shared - Only people with the link you share will be able to see the wishlist. The list will not appear in search results.
- Private - The wishlist will only be visible to you and can not be shared.
- First Name, Last Name - Your first & last name to be associated with the wishlist.
- Email Address - Your email address to be associated with the wishlist.
Enter in the appropriate information if you are creating a public wishlist or plan to share your wishlist with others. Others will be able to find public lists by searching for the information you enter here.
