Using the Stripe Payment Gateway App
Table of Contents
Overview
The Stripe Payment Gateway app allows you to accept on-site credit/debit card payments using Stripe.
Stripe is a payment gateway provider (much like PayPal) who will process your website's transactions and send the money to your bank account. Customers can pay at checkout using their credit/debit cards without leaving your site.
Stripe has no setup fees, no monthly fees, and no hidden costs. Hundreds of thousands of businesses rely on Stripe to securely accept payments and expand globally, and it's available to businesses in 25 countries. With Stripe, you can accept all major debit and credit cards from customers in every country in 135+ currencies, as well as accept payments via Apple Pay, Android Pay, and other local payment methods like Alipay or SEPA Direct Debit.
You will need an active Stripe account to use this gateway, and an SSL Certificate is also required.

Features
- Accept all major debit and credit cards as well as local payment methods.
- Optimised for mobile and fast checkout with Apple Pay, Google Pay, and Payment Request API support.
- Better detect and prevent fraud with the help of Stripe Radar and optional 3D Secure.
- Easily capture authorisations and process refunds from your Admin Dashboard.
- Support recurring payments with various payment methods via the Subscription Payments app.
- Quick installation & setup.
Setup & Usage
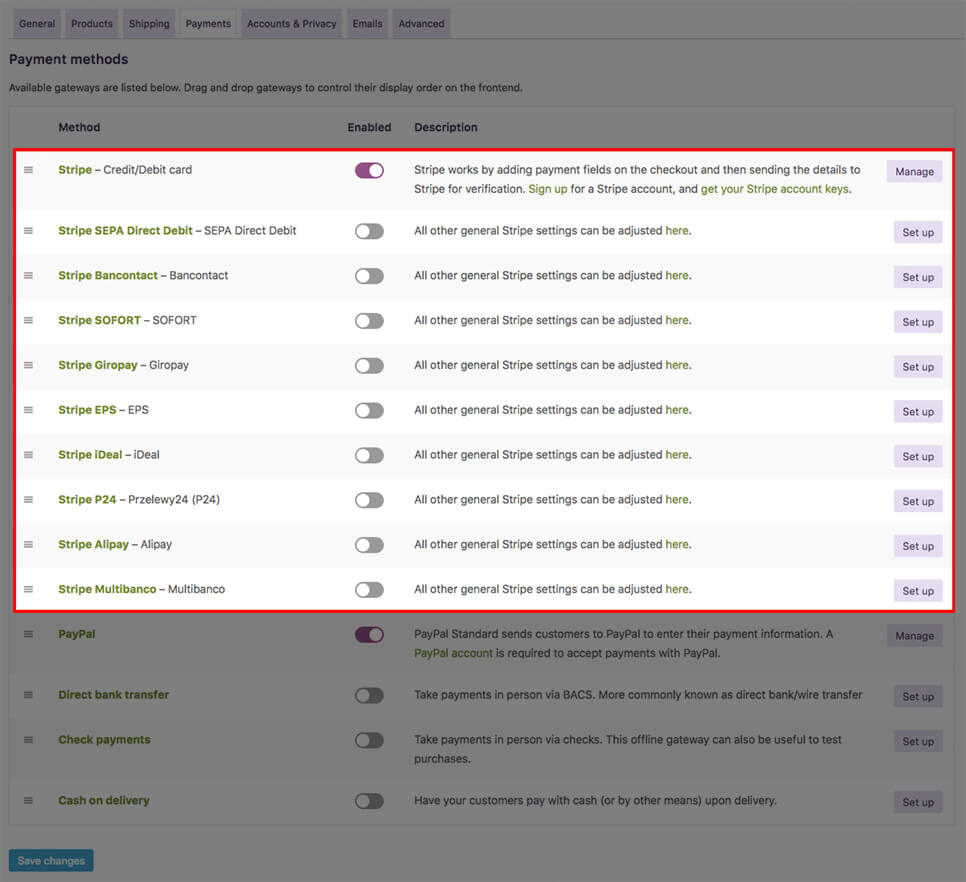
Once you've activated the Stripe Payment Gateway app in your website admin panel, you'll find some new payment methods & settings in your site admin panel under "Settings > Store Settings > Payments".

Added payment methods are:
- Stripe - The core payment method.
- Stripe SEPA Direct Debit - For buyers in France, Germany, Spain, Belgium, Netherlands, Luxembourg, Italy, Portugal, Austria, & Ireland.
- Stripe Bancontact - For buyers in Belgium.
- Stripe SOFORT - For buyers in Germany & Austria.
- Stripe Giropay - For buyers in Germany.
- Stripe EPS - For buyers in Austria.
- Stripe iDeal - For buyers in The Netherlands.
- Stripe P24 - For buyers in Poland.
- Stripe Alipay - For buyers in China.
- Stripe Multibanco - For buyers in Portugal.
General Stripe Settings
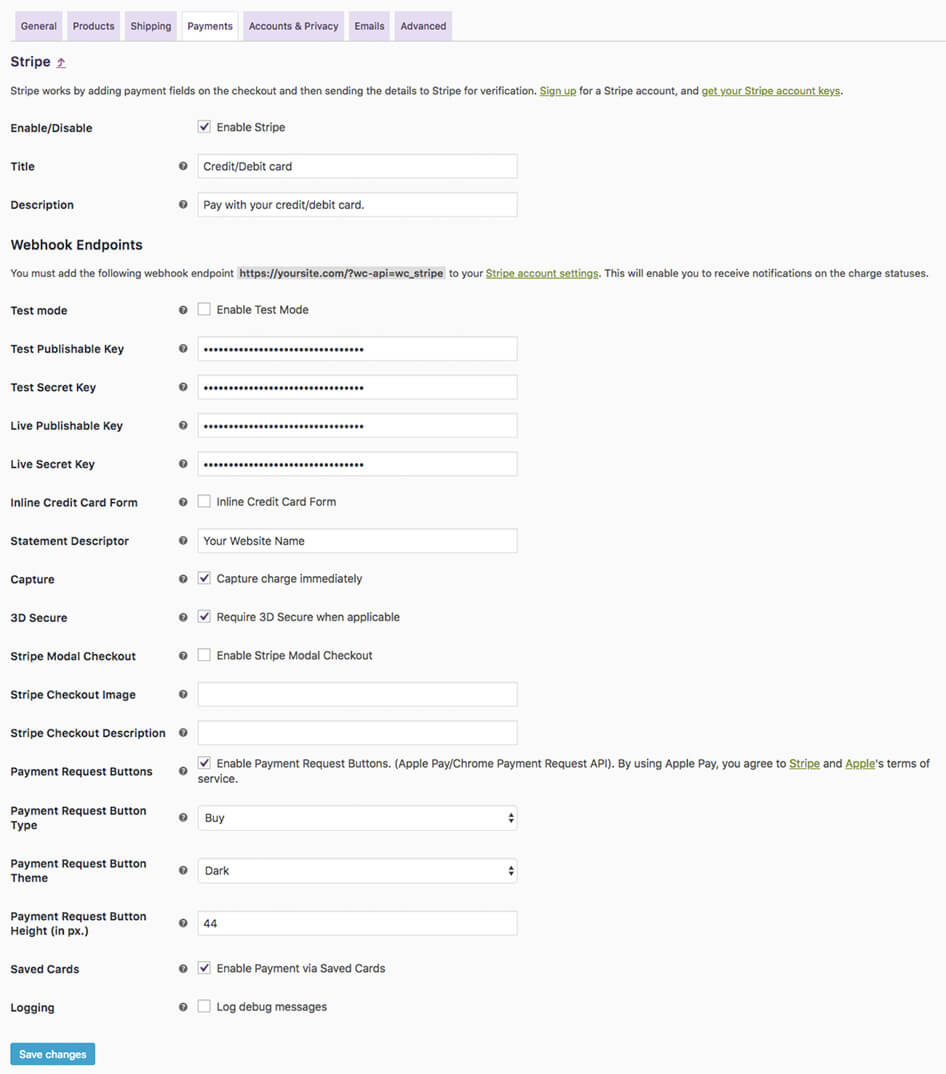
The core settings for Stripe can be found in your site admin panel under "Settings > Store Settings > Payments > Stripe".

- Enable/Disable - Check the box to enable Stripe checkout on your website.
- Title - This controls the title which the user sees during checkout.
- Description - This controls the description which the user sees during checkout.
- Test mode - Place the payment gateway in test mode using the test API keys.
- Test Publishable Key - Get your API keys from your Stripe account.
- Test Secret Key - Get your API keys from your Stripe account.
- Live Publishable Key - Get your API keys from your Stripe account.
- Live Secret Key - Get your API keys from your Stripe account.
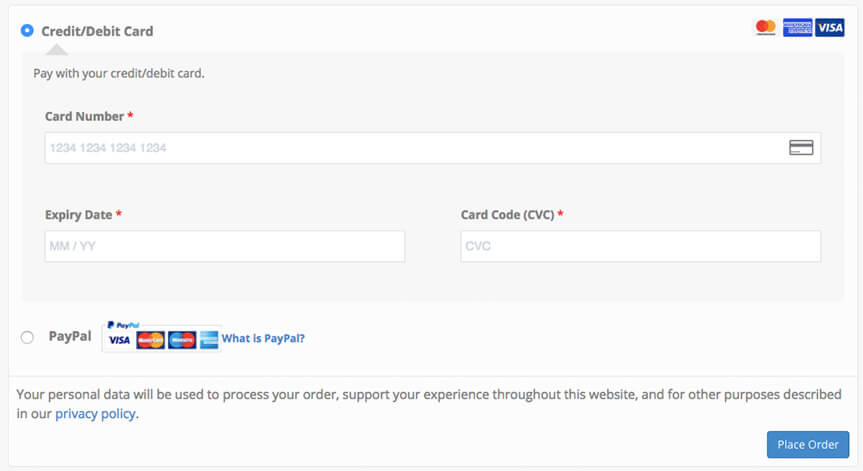
- Inline Credit Card Form - Choose the style you want to show for your credit card form. When unchecked, the credit card form will display separate credit card number, expiry date, and CVC fields.
- Statement Descriptor - This may be up to 22 characters. The statement description must contain at least one letter, and will appear on your customer's statement in capital letters.
- Capture - Choose whether or not to immediately capture the charge. When unchecked, the charge issues an authorisation and will need to be captured later. Uncaptured charges expire after 7 days.
- 3D Secure - Some payment methods have a 3D Secure feature. This is an extra security layer for your store. Choose how to handle payments when 3D Secure is recommended. Enabling would require customers to use 3D Secure when recommended.
- Stripe Modal Checkout - If enabled, a "Pay" button and modal credit card form will appear on the checkout instead of credit card fields directly on the page. It's recommended to leave this disabled and use the embedded form.
- Stripe Checkout Image - Optionally enter a URL for a 128x128px image of your brand or product.
- Stripe Checkout Description - Shows a description of your store on the Stripe Modal Checkout form.
- Payment Request Buttons - If enabled, customers will be able to pay using Apple Pay or Chrome Payment Request if supported by the web browser.
- Payment Request Button Type - Select the button type you'd like to show.
- Payment Request Button Theme - Select the button theme you'd like to show.
- Payment Request Button Height - Enter the height you'd like the button to be in pixels. Width will always be 100%.
- Saved Cards - If enabled, customers will be able to pay with a saved card during checkout. Card details are saved on Stripe's servers, not on your store.
Webhook Endpoints
Webhooks are a way for Stripe to communicate with your site. It provides information such as the status of the transactions to your site and can even update the order based on that information. We highly recommend for you to set this up on your Stripe dashboard and it is as simple as copying and pasting a simple link. If you go to your Stripe settings page in your site admin panel (under "Settings > Store Settings > Payments > Stripe > Webhook Endpoints"), you will see your generated webhook link - which is typically your website's home URL ending with /?wc-api=wc_stripe.
Copy the link, then go to your Stripe Dashboard Webhook Setting and click on "Add Endpoint". Paste the link into the URL field and click on "Add Endpoint". You'll want to choose the option to "Send all event types".
Payment Request Buttons
Apple Pay and Google Pay are the most well known payment request types, and Google Pay is the name for all payment methods which fall under the Google umbrella, including Android Pay, Chrome payments, and Pay with Google. Most official documentation may still refer to "Google Pay" or "Android Pay" but for customers on your site, these are all the same.
To see what a payment request button will look and behave like, please see the Stripe.com Payment Request button documentation page.
Apple Pay
Make sure that the "Payment Request Buttons" option is enabled in the Stripe settings.
Before you can start accepting payments with Apple Pay, you must accept the Terms of Service in your Stripe dashboard, and then add the domain of your site (without any www. or https://).
You do not need to upload the verification file to your site, the Stripe Payment Gateway app will do this for you automatically in the background. After you've added the domain to your Stripe account, you can check that this file exists by heading to yoursite.com/.well-known/apple-developer-merchantid-domain-association (replacing yoursite.com with your site's domain). If this file does not exist then please open a support ticket.
Customers will need to have a payment method from a supported bank or payment card provider to use Apple Pay, please see the Apple Pay support page for more details, along with a compatible Apple device or the Safari browser.
Google Pay
Make sure that the "Payment Request Buttons" option is enabled in the Stripe settings, there is no other setup for you to accept payments via this method.
The Google Pay button on mobile devices will only show when there is a saved payment card, and with all the permissions allowed for Google Play services.
Customers will need to have a payment method from a supported bank or payment card provider, please see the Google Pay support page for more details, along with a compatible Android device or the Chrome browser.
Additional Payment Methods
Aside from standard credit/debit cards & Payment Request buttons built into the main Stripe payment method, Stripe comes with additional payment methods that can be used to target different markets in different countries.
These include: SEPA Direct Debit, Bancontact, SOFORT, Giropay, EPS, iDeal, P24, Alipay, & Multibanco.
For detailed information about these payment methods, please visit Stripe Payment Methods. Most of these additional payment methods will need to be enabled under your Payment Settings on your Stripe Dashboard. Some may also require additional information to work.
Once enabled in Stripe, they can then be enabled on your website under "Settings > Store Settings > Payments" by clicking the slider icon. You can also change the title and description for each service.
Customer Usage
Customers pay on your site's checkout page. The payment form uses Stripe Elements which provides enhanced security, styles, and a better customer experience.
Using a new card, they will see the option to enter credit card details, and tick the "Save card info for future purchases" box (if enabled).

Your regular customers who have a saved card are presented with the saved cards (if enabled) with an option to pay using that card, or they can use a new one.
When Payment Request Buttons are enabled, customers see the corresponding button on the product page and on the cart page when using a supported device, browser, and payment method.
On your site's front-end "My Account" page, customers can add, view, and remove saved cards from their account within the "Payment Methods" submenu.
