Using the Performance App
Table of Contents
Overview
The Performance app has just one job - to make your site load faster. It offers minimal configuration combining both simplicity and speed for immediate results.
Features
Quick Setup
The Performance app configuration is simple, fast, and intuitive. It starts speeding up your website with the most compatible settings right off the bat. No programming knowledge is required.
Cache Preloading
Our crawler simulates a visit to preload the cache on your site, meaning the indexing of your website by search engines is instantly improved.
Sitemap Preloading
Preload all the URLs in your site's XML Sitemap to ensure that your site's cache is always warm.
Database Optimisation
Clean up your site's database to remove bloat and reduce its size, boosting your website's performance. Schedule regular cleanups to keep things running smoothly.
Remove Query Strings from Static Resources
Improve your GT Metrix grade by removing query strings from CSS/JS files. Cache busting is retained by encoding the version number into the URL.
CloudFlare Compatibility
Integrating with CloudFlare is easy. Manage your CloudFlare cache, enable development mode, and get better security and performance - without leaving your dashboard (Requires a free CloudFlare account).
Content Delivery Network (CDN) Compatibility
To reduce the latency of HTTP requests, you can easily and seamlessly use CDN services on your website (such as MaxCDN).
DNS Prefetching
Reduce the time of DNS resolutions from external domains by preloading.
Page Caching
Caching creates an ultra-fast load time, essential for improving Search Engine Optimisation, and increasing conversions. When you activate the Performance app, page caching is immediately activated on your website.
GZIP Compression
To optimise the rendering of web browsers and save bandwidth, we facilitate the work of the browser with gzip compression, expires headers, & etags.
Browser Caching
With browser caching, static contents (JS, CSS, images) are stored in the visitor's browser. When a visitor goes to another page on your website, your static content doesn't need to be loaded again.
Google Fonts Optimisation
Less HTTP requests for a faster website thanks to Google Fonts optimisation.
LazyLoad
Images are loaded only as your visitor scrolls down the page, improving the load time of the page. Facebook, YouTube, Yahoo, and other major websites are using this technique - now yours can too.
Minification/Concatenation
The Performance app reduces the weight of your HTML, JavaScript, and CSS files through minification. Lighter files means a faster load time!
Defer JS Loading
JavaScript files are loaded after the page has rendered, reducing the loading time of your website.
Ecommerce Friendly
Cart & Checkout pages are automatically excluded from caching.
Setup & Usage
Once you've activated the Performance app in your website admin panel, you'll find a new "Performance" dropdown in your admin bar giving you quick-links to customise the settings and clear the cache. You can customise the app settings by visiting "Settings > Website Settings > Performance".
Settings
The Performance app settings are split up into tabs.
Basic
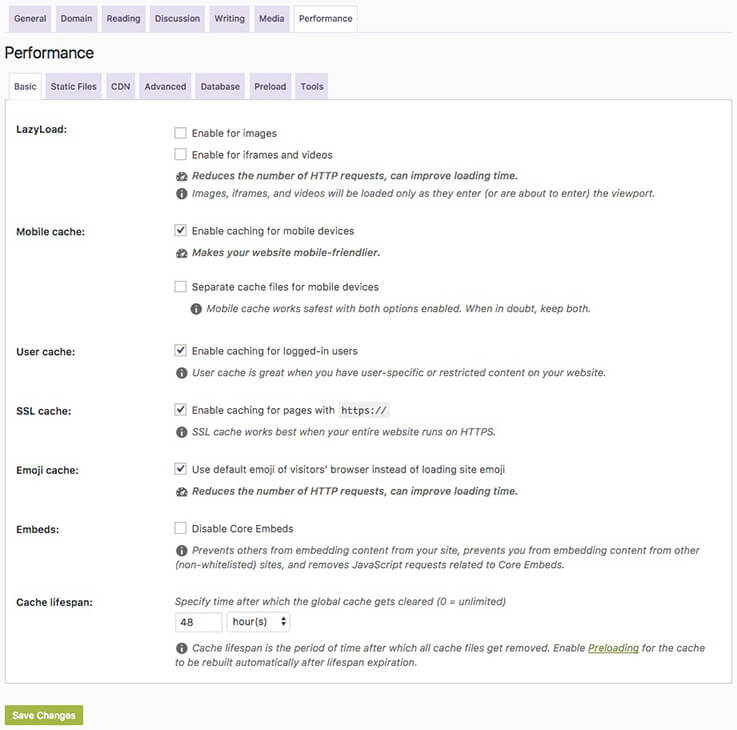
It's recommended to thoroughly test your website's frontend when enabling any of these options.
- LazyLoad - LazyLoad is a function that blocks content from rendering or being loaded on a page until it enters (or is about to enter) the visitor's browser viewport. Enabling this can drastically speed up initial page load times especially if pages contain a lot of images, videos, and/or iframes by reducing HTTP requests.
- Enable for images
- Enable for iframes and videos
- Mobile cache
- Enable caching for mobile devices - Makes your website mobile-friendlier.
- Separate cache files for mobile devices - Mobile cache works safest with both options enabled.
- Enable caching for logged-in users - Great when you have user-specific or restricted content on your website.
- Enable caching for pages with https:// - Works best when your entire website runs on HTTPS (requires an SSL certificate).
- Use default emoji of visitors' browser instead of loading site emoji - Reduces the number of HTTP requests which can slightly improve loading times.
- Disable Core Embeds - Prevents others from embedding content from your site, prevents your users from embedding content from other non-whitelisted sites, and removes JS requests related to core embeds.
- Cache lifespan - Specify time after which your website's global cache gets cleared. Cache lifespan is the period of time after which all cache files get removed. You can enable Preloading for the cache to be rebuilt automatically after lifespan expiration. If your site content isn't updated often you can set a high number or set "0" to never automatically clear cache.
Static Files
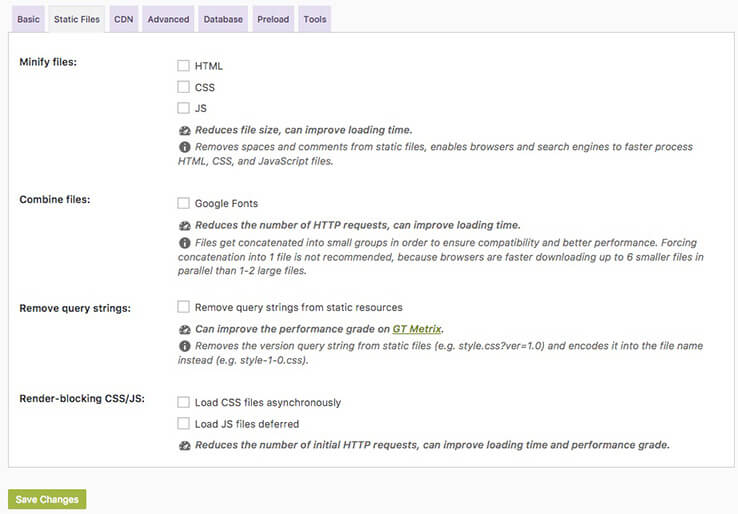
It's recommended to thoroughly test your website's frontend when enabling any of these options.
- Minify files - Minification will remove all spaces and comments from static files, which enables browsers and search engines to faster process HTML, CSS, and JavaScript files.
- HTML
- CSS
- JS
- Combine files - Combining will concatenate files into small groups in order to ensure compatibility and better performance. Forcing concatenation into 1 file is not recommended though, as browsers can download up to 6 smaller files in parallel much quicker than 1-2 large files. Enabling concatenation will reduce the number of HTTP requests which can improve loading time.
- Google Fonts
- CSS - Shown only if "CSS" is selected in the "Minify files" option.
- Combine all CSS files into as few files as possible - Shown only if "CSS" is enabled. Not recommended in most cases (test thoroughly).
- JS - Shown only if "JS" is selected in the "Minify files" option.
- Combine all JavaScript files into as few files as possible - Shown only if "JS" is enabled. Not recommended in most cases (test thoroughly).
- Exclude CSS - Specify the URLs of CSS files to be excluded from both minification and concatenation. The domain will be stripped automatically, and wildcards are accepted to exclude all CSS files in a specific folder by using
(.*)- for example/wp-content/some-folder/(.*).css - Exclude JS - Specify the URLs of JavaScript files to be excluded from both minification and concatenation. The domain will be stripped automatically, and wildcards are accepted to exclude all JS files in a specific folder by using
(.*)- for example/wp-content/some-folder/(.*).css - Remove query strings from static resources - Query strings are sometimes used in static resources to give the file version to the browser so that the browser knows if a file has been updated and the file needs to be reloaded rather than a cached version used. Selecting this option will remove the query string (eg. style.css?ver=1.0) and encode it into the filename instead (eg. style-1-0.css). This option is generally not recommended, though it can improve your website's performance grade on GT Metrix.
- Render-blocking CSS/JS - Reduces the number of initial HTTP requests which can improve loading time.
- Load CSS files asynchronously
- Load JS files deferred
- Safe mode - shown only if "Load JS files deferred" is enabled.
- Critical path CSS - Shown only if "Load CSS files asynchronously" is enabled. Specify CSS rules required for rendering above-the-fold content. You can use this Critical Path Generator to specify required CSS rules for your website.
CDN
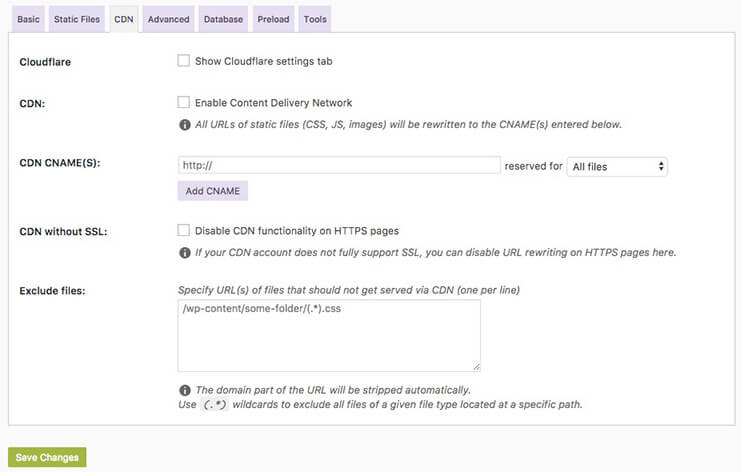
It's recommended to thoroughly test your website's frontend when enabling any of these options.
- CloudFlare - Selecting this option enables a new "CloudFlare" settings tab which will appear after the settings have been saved.
- CDN - Select to enable the Content Delivery Network on your website - "CDN CNAME(S)" must be filled for this to work.
- CDN CNAME(S) - Enter the CNAME for your Content Delivery Network. You can optionally enable the CDN for all files, only images, only CSS & JS, only JS, or only CSS files, and you can also set multiple different CNAMEs for different file-types.
- CDN without SSL - If your CDN of choice doesn't support SSL/HTTPS, you can disable URL writing on HTTPS pages.
- Exclude files - Some site features may stop working if they're served over a CDN, and you can exclude the related files from being served over the CDN with this setting. The domain part of the URL will be stripped automatically, and you can use wildcards to exclude all files located in a specific path/folder by using
(.*)- for example/wp-content/some-folder/(.*)
Advanced
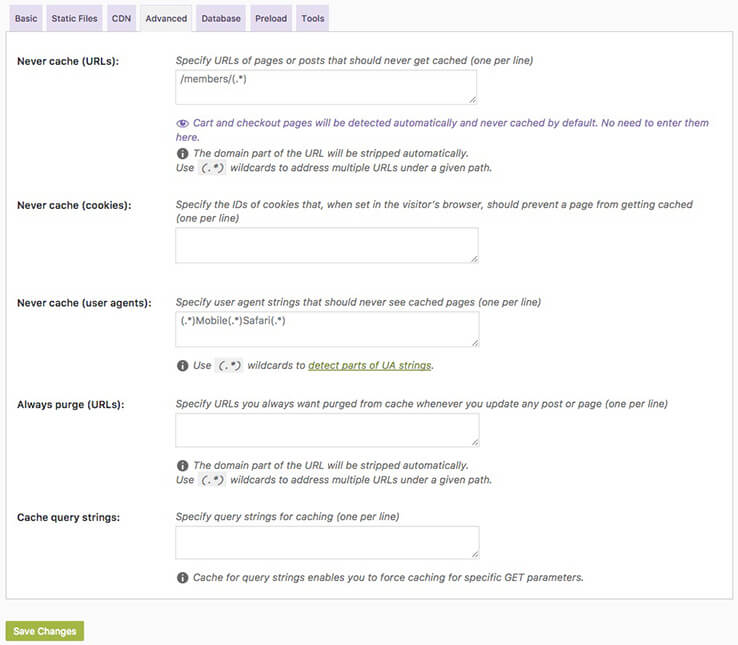
It's recommended to thoroughly test your website's frontend when enabling any of these options.
- Never cache (URLs) - Specify URLs of pages that should never get cached. Cart & Checkout pages will be detected automatically and are never cached. The domain part of the URL will be stripped automatically, and you can use wildcards to exclude multiple URLs located in a specific path by using
(.*)- for example/some-path/(.*) - Never cache (cookies) - Specify the cookie IDs that should prevent a page from being cached when set in the visitor's browser.
- Never cache (user agents) - Specify the user agent strings that should never see cached pages. You can use wildcards to detect parts of UA strings by using
(.*)- for example(.*)Mobile(.*)Safari(.*) - Always purge (URLs) - Specify URLs you always want purged from cache whenever a post or page is updated. The domain part of the URL will be stripped automatically, and you can use wildcards to exclude multiple URLs located in a specific path by using
(.*)- for example/some-path/(.*) - Cache query strings - Cache for query strings enables you to force caching for specific GET parameters.
Database
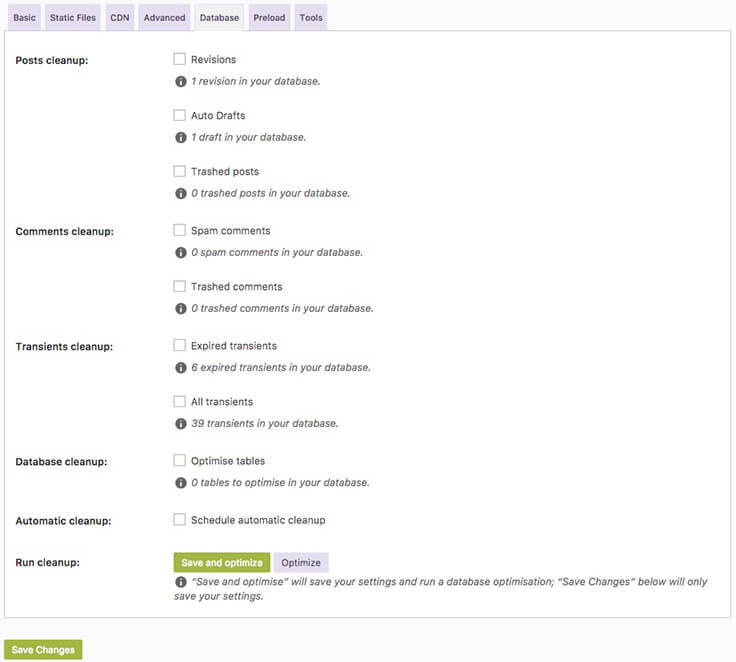
These options are for advanced users who know what they're doing. It's recommended to contact support before enabling any of these options.
- Posts cleanup - Options are "Revisions", "Auto Drafts", & "Trashed posts". In most cases these are fine to enable & schedule.
- Comments cleanup - Options are "Spam comments" & "Trashed comments". In most cases these are fine to enable & schedule.
- Transients cleanup - Options are "Expired transients" & "All transients". In most cases enabling & scheduling the expired transients cleanup is fine, but if you're using any ecommerce functions on your website it may be best to leave "All transients" unchecked.
- Database cleanup - In most cases this is fine to enable & schedule.
- Automatic cleanup - Select to enable automatic database cleanup on a daily, weekly, or monthly schedule.
- Run cleanup - Clicking the "Save and optimise" button will save your settings and run a database optimisation.
Preload
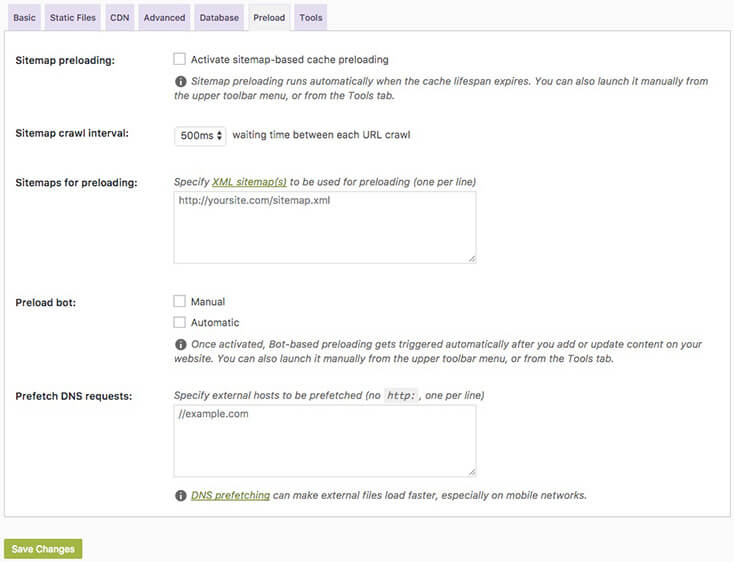
- Sitemap preloading - Once enabled, sitemap preloading will run automatically when the cache lifespan expires. You can also launch it from the "Performance" menu in the admin bar, or from the "Tools" tab of the app settings panel.
- Sitemap crawl interval - Select the waiting time between each URL crawl. Generally this number doesn't need to be less than 1-2 seconds as it could cause strain on the servers.
- Sitemaps for preloading - Enter the URL of your website's XML sitemap(s) to be used for preloading. You can enable & find the URL for your sitemap in your admin panel under "Settings > Website Settings > Reading".
- Preload bot - Select either "Manual" or "Automatic" preloading. Once activated, bot-based preloading will get triggered automatically after you add or update content on your website. You can also launch it manually from the "Performance" menu in the admin bar, or from the "Tools" tab of the app settings panel.
- Prefetch DNS requests - DNS prefetching can make external files load faster, especially on mobile networks. Enter URLs of external hosts to be prefetched without the "http:".
CloudFlare
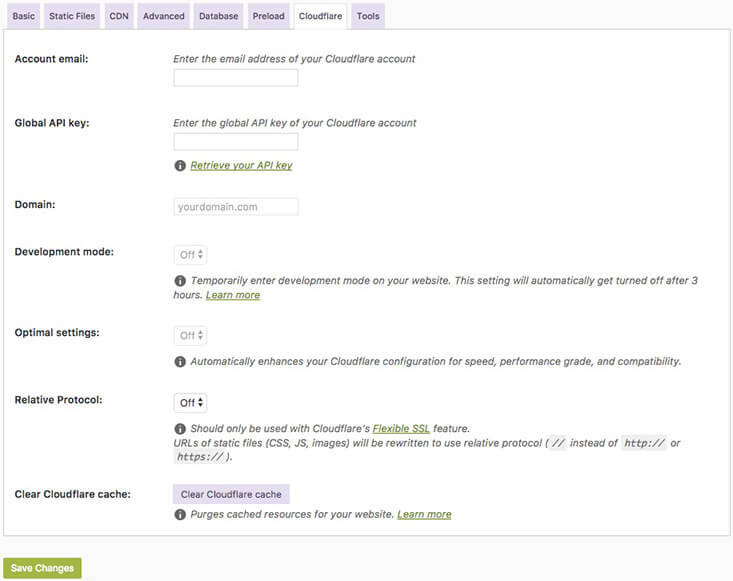
The CloudFlare tab will be displayed once the "CloudFlare" option in the "CDN" settings tab has been enabled and the settings have been saved.
- Account email - Enter the email address used for your CloudFlare account.
- Global API key - Enter your CloudFlare account's global API key. Instructions for finding this can be found here.
- Domain - Enter the domain for your website set up in your CloudFlare account - it should match the domain of your website.
Entering these options will enable your website access to your CloudFlare account settings, enabling the following settings.
- Development mode - Enable to temporarily enter development mode for your website, disabling CloudFlare's cache features. This setting will automatically turn off after 3 hours.
- Optimal settings - Enabling this will automatically enhance your CloudFlare account configuration for speed, performance grade, and compatibility.
- Relative Protocol - URLs of static files (images, JS files, CSS files) will be automatically rewritten to use a relative protocol (
//instead ofhttp://orhttps://). This should only be used with CloudFlare's Flexible SSL feature. - Clear CloudFlare cache - Clicking the button will purge all cached resources for your website on CloudFlare's servers.
Tools

The tools tab gives options to manually clear the cache for your whole website, and to also manually preload the cache according to your preload settings set in the "Preload" tab.
Disabling Additional Options on a Specific Page/Post
If you experience issues with a specific feature of the Performance app on a specific page or blog post, you can disable the feature on that page, but keep it active globally on other parts of your website.
Head to the page or post's edit screen in the admin panel and you'll find a "Cache Options" metabox which is specifically for the page/post you're currently editing. Un-check the desired option(s) and update your post.
Note that if any of the options are not globally activated in the main app settings (under "Settings > Website Settings > Performance"), they will be disabled in the Cache Options metabox.
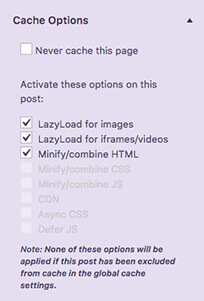
If you don't see the "Cache Options" metabox on your edit screen, check if it is activated on the Screen Options panel located in the top right of the page.
